roasted carrot + ginger ninja soup

roasted carrot + ginger soup

There’s something about a good soup recipe. Even better – a soup recipe that uses up all of those random carrots that I tend to find at the bottom of my vegetable crisper. I swear, they seem to multiply down there when I’m not looking.

Soup is something I cook when I know I’m going to be short on time, but still want something satisfying, wholesome and soul-filling. This soup reaches right down to the bottom of your toes, filling you up with a ginger-y warmth that tingles on your tongue.

It’s also a nutritional powerhouse. Lots of onion, garlic + ginger (all awesome for digestion and discouraging cancer), carrot (vitamin A), turmeric (stellar inflammation fighter), and miso. Inspired by this recipe from smitten kitchen, I decided to adapt it to my tastes by roasting all the vegetables first. This intensifies their flavour and gets rid of some of the moisture, which should prevent a watery soup. Most soup recipes can be adapted to a roasting method, and they all do better for it I think.

Around here lately, it’s been hot, and humid, and generally quite disgusting. But I still want to eat this soup – it’s like a big umami hug. Life feels busy at the moment, but productive and whole. Let’s just say I’m enjoying being present – it feels good. X

carrots
chopped up
carrot-soup-combo
soup w trimmings

roasted carrot and ginger ninja soup

serves 4-6

recipe notes

  • this soup is delicious as is, but i also imagine that the addition of a bit of sweet potato, pumpkin or normal potato wouldn’t hurt it either
  • the sesame oil to finish is something you really shouldn’t skip. this soup is also delicious served with a scoop of brown rice and some roasted (or fresh) tofu.
  • i give two methods for blending the soup – my preference is for blending in batches in a blender, as I find that I get a much smoother, creamier result – but it’s your preference.

ingredients

  • 700 g (1 lb 8 oz) carrots
  • one decent thumb-sized piece of ginger
  • 1 large (~200g) zucchini
  • 1 large (~160 g) onion
  • 3 fat garlic cloves
  • 2 tbsp olive oil (not extra virgin)
  • 2 tsp turmeric
  • 1/4 c shiro miso paste
  • 5-6 cups of vegetable broth or water

to serve:

  • sesame oil
  • shichimi togarishi (Japanese seven-spice mix)

Preheat oven to 190 C (375 F). Roughly slice the carrots, and zucchini (leaving the carrot peel on). Roughly dice the ginger and onion (no need to peel the ginger either!). In a large baking tray, toss the carrot, zucchini, onion and ginger with the olive oil. Do not salt at this stage – there will be plenty of salt in your miso and broth. Wrap the whole garlic cloves in foil and nestle somewhere in the tray. Place the tray in the oven and bake for 45-55 minutes, until everything is soft and lightly browned.

When cooked, remove the vegetables from the oven. Squeeze the soft garlic from its skins. You can now proceed in two ways: (1) blend the cooked vegetables with the remaining ingredients in a blender in batches, and combine the batches in a large saucepan to heat up again. Or (2) place the cooked vegetables with the remaining ingredients in a large saucepan and blend with an immersion blender. For both methods, adjust with more or less liquid to achieve your desired thickness.

Warm the soup for a few minutes – it shouldn’t have lost too much heat during the blending. Serve with a drizzle of toasted sesame oil, and a little bowl of shichimi togarishi on the table for sprinkling.

taco fiesta + raw garlic sauce + simple tomato salsa

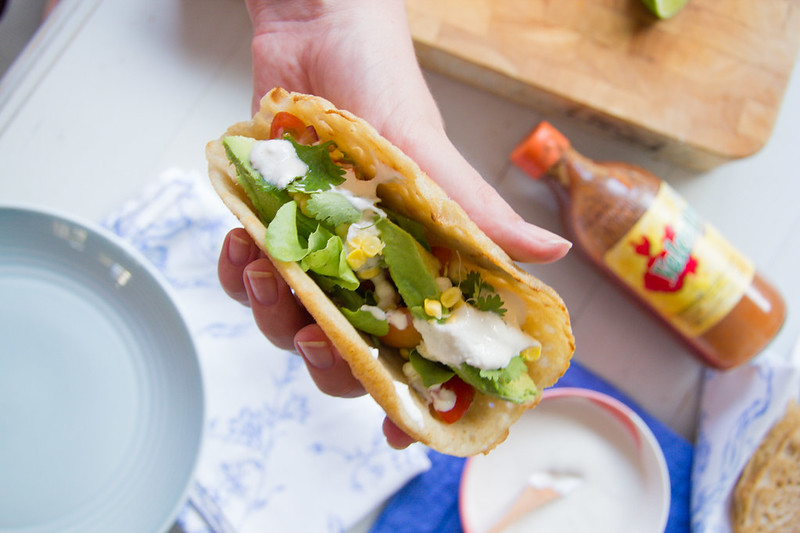
taco assembly

We’re big into Mexican flavours in this house. Burrito night at our favourite Taqueria is at least once a week, and at home, burrito bowls, mini-burritos and tacos make a regular appearance. There’s something magical about the bringing together of corn, lime, tomatoes, avocado, beans and chilli. It’s fresh and tasty and always satisfying.

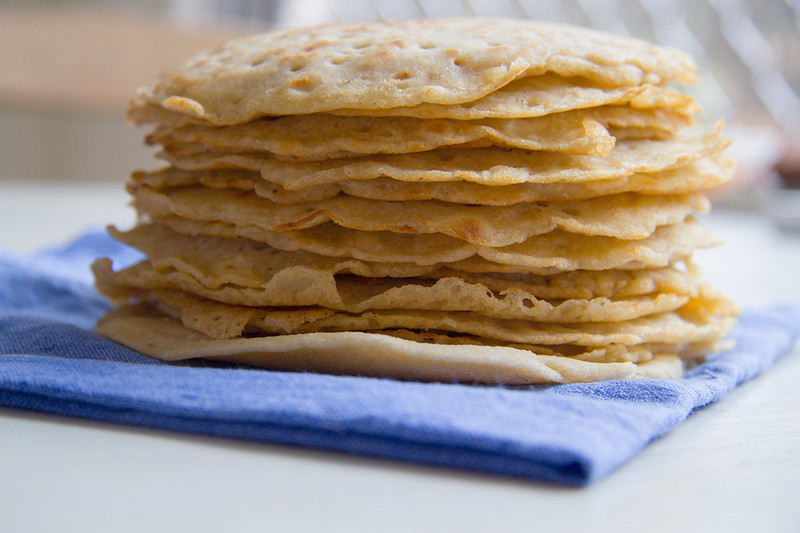
Here I’ve included a little recipe for corn-free and gluten-free taco tortillas (adapted from Elenore’s recipe over at Earthsprout). They’re definitely not traditional or authentic in any sense, but I think they’re a nice little change. Also – unlike the gluten-free tortillas you can get from the supermarket, they’re not full of numbers (because numbers are crap). These tortillas are best served straight away, but the next day they also work up nicely into a quesadilla.

The accompaniments are also crucial – lime-y tomato salsa, and a raw garlic sauce that is just so delicious. It uses cashews as the base, so the sauce is creamy and smooth. It’s also great over soups, in sandwiches, on top of salads, or as a dip.

One of my favourite aspects of this sort of meal is that you really can put almost anything in a tortilla – it really depends on what you’ve got on hand – some of my favourites are: fresh (raw) corn, salad mix, avocado, massaged kale, black beans, coriander leaves, sliced spring onions. Basically whatever is good.

Adam and I enjoyed this taco feast last Friday for Valentine’s day, and the next day, the leftovers were just as good. Happy taco-making, friends!

taco-split
simple salsa
tortilla stack
assembly line
taco spread
taco

multigrain tortilas

makes about 15 taco-sized tortillas

adapted from Earthsprout

notes:

  • these are best served straightaway, however the next day they’re excellent warmed and then used to make quesadillas

ingredients:

  • 1/2 c buckwheat flour
  • 1 c millet flour
  • 1 c brown rice flour
  • 1/2 tsp baking powder
  • 1/2 tsp salt
  • 2.5 c water
  • 4 tbsp olive oil + more for frying

In a large bowl, combine flours, salt + baking powder. Create a well in the centre, and pour in the water and oil. Whisk to combine. All to sit for 10 minutes – by this time, the batter should have a thick, but flowing consistency.

Heat a frying pan over high heat. Lightly brush with oil. Using a 1/4 cup measuring cup, pour 1/4 cup of batter into the pan, tilting it to spread the batter around. Cook for 1 minute or so, until bubbles have formed and the surface is no longer shiny. Using a spatula, flip and cook for another minute.

Remove the tortilla from the pan and wrap in a tea towel – this step is crucial as it traps the steam and softens the tortilla, making it possible to use it for tacos.

Repeat with remaining batter, making sure to lightly re-oil the pan for each tortilla. If not eating immediately, wrap in your tea towel and store in an airtight container in the fridge until needed. The tortillas can be reheated by covering in a damp tea towel and gently heating in an oven until hot.

simple tomato salsa

makes ~ 1 cup

ingredients

  • 125 g cherry tomatoes, diced small
  • 1/8 large, or 1/4 small red onion, diced small
  • pinch of salt
  • juice of 1/4 lime

Combine all ingredients in a small bowl and allow the flavours to mingle for 30 minutes before serving. The salsa will keep in the fridge for 2 days or so.

raw garlic sauce

makes ~ 3/4 cup

ingredients

  • 1/2 cup raw cashews, soaked for 4 hours or overnight, then drained
  • 1 fat, or 2 small, garlic cloves
  • pinch of salt
  • 1 tbsp olive oil
  • juice of 1/2 lemon

Combine all ingredients in a blender (the higher the speed, the better). Blend on high until the sauce is thick and silky smooth – this make take some time, and will require you to scrape down the sides of the blender every so often. It may be necessary to add 1-2 tbsp water to thin, if desired – but take care to only add 1 tbsp at a time. The sauce should be pourable but not watery. Pour into a glass jar and store in the fridge until required, where it will keep for 3-4 days.

taco fiesta filling ideas

  • mixed salad leaves
  • fresh, raw corn corns
  • fresh coriander leaves
  • sliced avocado
  • hot sauce (naturally)
  • lime wedges
  • black beans
  • sliced spring onions

raspberry + rosewater (valentine) smoothie

valentine-smoothie

Valentine’s Day – it’s pretty commercial, and I’m not into that side of it – but I’m definitely ok with taking a moment to express gratitude for the friends, family, and loved-ones that constantly bring joy and love into my life. And chocolate. I’m definitely ok with the chocolate.

This past year I’ve also really woken up to the truth of loving yourself so you can better love others. So in the spirit of that intention, I’ve created a delicious (and probably over-the-top) smoothie that loves your body as much as you’ll love it (I hope). It’s packed full of raspberries, banana and pear, and made extra kitschy by the addition of rosewater. Topped with rose petals, cacao nibs and pistachios, I think it fulfils nearly every corny Valentine’s requirement.

Happy Valentine’s Day friends, whoever you’re loving. For me, I’m going to try and carry that open expression of love throughout the rest of the year. XX

valentine smoothie ingredients
rose petals
love in a glass
valentine smoothie: raspberry and rosewater

raspberry + rosewater smoothie

serves 2 as a snack, 1 as a meal

recipe notes

  • if you’re not into raspberries, strawberries are also delicious

ingredients

  • (~70 g or 1 small) frozen banana pieces
  • 1 cup (120g) frozen raspberries
  • 1 small (~90g) pear, cored and diced
  • scant 1 cup (220 ml) cashew milk (or almond/soy/oat/cow etc)
  • 1 tbsp maple syrup/honey/agave
  • 1/2-1 tsp rosewater
  • to serve: cacao nibs, organic dried rose petals, chopped pistachios

In a blender, combine banana pieces, raspberries, pear, cashew milk and maple syrup (or other preferred sweetener). Blend on high speed until smooth and silky. Add 1/2 tsp rosewater, blend and then taste. Adjust sweetness if you would like it sweeter, and add more rosewater if you desire (it can be overpowering, so it’s better to start small and add a little bit at a time).

Pour into glasses and top with cacao nibs, rose petals and chopped pistachios. Soak up the love!

buckwheat granola + breakfast oats for one

granola

Hello – right off the bat – I missed you guys. But now my chapter is in (fucking, yeah!) and I can return to my little corner of the internet newly reinvigorated and ready to fill your screens with marvellous things. Ready?

I’ve had several little realisations lately – like that my favourite colour is yellow, not blue – or that the metal circle on the side of my toast tongs is a magnet (genius, by the way) – or that to make the perfect French press coffee you need to plunge straight away – or that granola is almost infinitely tastier and better in every dimension when you make it with buckwheat, not oats.

Madness, you say? Maybe, but the right kind of crazy, I assure you. Making granola on buckwheat requires a teensy bit more prep (soaking), and a longer, slower cooking time, but it’s absolutely, assuredly worth it. The buckwheat absorbs a lot of liquid during soaking which then evaporates in the oven, leaving crunchy crunchy deliciousness. It’s also fragrant and tasty in a way you could never achieve with oats. I’m not saying I’ll never make granola with oats again, but this buckwheat version is going to be in very frequent rotation (bonus: it’s totally gluten free!).

Now that I’m back on campus and the working year has commenced, breakfast suddenly becomes a very important part of my day. I’ve been doing lots of breakfasts in jars – make them the night before (or even days before), and in the morning you’ve already made a good choice (go you!). I can grab it out of the fridge and take it to uni if I’m in a rush, or eat it at home. Easy peasy. Soaked oats, birchers, chia puddings have all been getting a good work over in my mason jar. Here I’ve got the simplest, most basic version of soaked oats I make. Treat it as a base to use whatever fruit or toppings you have around. Berries, granola, cacao nibs, stewed plums, and almonds all make regular appearances. But spiced stewed apples or pears would also be freakin’ delicious. Make it your own, lovelies!

raw buckwheat tight
buckwheat-granola-split
mix-ins
easy breakfast
layered oats + granola
buckwheat granola
stripey stripes
buckwheat granola feast

buckwheat granola

makes ~2-3 cups

recipe notes

  • this recipe has a long cooking/prep time, but – before you run away – it’s mostly inactive – which means you can have a cup of tea and watch a movie/read a book/be awesome while the granola’s doing its thing
  • really make sure you give the buckwheat a good rinse after the first soak to get rid of the slimy coating it develops
  • if you’re not into seeds or cranberries, feel free to substitute – i’m a lazy cook, so seeds appeal to me because hey, no chopping
  • if your granola still seems too wet after 1.5 hrs, keep checking every 10 minutes or so until it seems dry enough, bearing in mind that it will crisp up as it cools

ingredients

  • 1 cup (200 g) raw buckwheat groats
  • scant 1/2 cup (60 g) sunflower seeds
  • scant 1/2 cup (60 g) pepitas (pumpkin seeds)
  • 1/3 cup (40 g) dried cranberries
  • 2 tbsp (25 g) sesame seeds
  • 2 tsp vanilla extract
  • 2 tbsp olive oil
  • 3 tbsp maple syrup
  • pinch of salt
  • 1 tsp ground cinnamon

Place the buckwheat in a bowl, cover with filtered water and soak for 1 hour. After 1 hour, drain, rinse well, and cover the buckwheat with fresh water and let soak for another 45 minutes.

Preheat oven to 120 C (250 F) (no fan). Line a baking tray with baking paper. Line a strainer with cheesecloth and drain the buckwheat, rinsing again. Let the buckwheat sit and drain for 10 minutes.

Meanwhile, combine the remaining ingredients in a large bowl. Once the buckwheat has drained, add it to the other ingredients, stirring thoroughly to coat. Tip the granola onto your baking tray and with wet hands, work it into as flat a layer as possible. Place in the oven for 1.5 hours. When cooked, the granola should be lightly golden and not feel completely wet to the touch. Remove from the oven and allow to cool completely. It should form little granola sheets as it cools. Store in an airtight container at room temperature for 1-2 weeks (though mine never lasts that long).

breakfast oats for one

serves one

recipe notes

  • as I mentioned above, this recipe is a completely blank slate – do with it what you will – fruit, toppings, flavourings can all be customised to your whim. in this version I’ve topped mine with 2/3 c frozen blueberries and a decent handful of buckwheat granola.

ingredients

  • 1/3 cup rolled oats
  • 1 tsp chia seeds
  • tiny pinch of salt
  • 1/2 c milk of your choice (almond, cashew, soy, whatever) or even water
  • squeeze of lemon juice
  • optional: berries (even frozen – they defrost by the morning); stewed plums, apples, granola, nuts, seeds, cacao nibs, ad infinitum.

In a 400 mL glass jar (with a screw top lid – mason jars are perfect), combine the oats, chia seeds and salt. Give in a quick mix, then stir in the milk/water and lemon juice. Top with some fruit, granola or your toppings of choice. Seal the jar and leave in the refrigerator overnight.

In the morning, it’s ideal to let the jar sit for 5-10 minutes at room temperature, but not necessary. Enjoy!