raw plum tartlets + saying goodbye to summer

raw plum tartlets

It’s officially autumn now and, while the temperatures are still warm, little signs of change are becoming perceptible. It’s dark now when I wake up to head to yoga. The mornings are cooler, the breeze crisper. All little, wonderful whispers of the season to come. It’s no secret that I’m not a fan of summer – the cooler months are definitely my jam. I’m so looking forward to breaking out the knits and blankets, lighting candles in the afternoon and snuggling up with a cup of tea.

But it’s not quite winter yet, so I decided to farewell summer with the last stone fruits: plums. After the peaches and apricots and nectarines have faded, the plums linger well into the first month of autumn. They are the quintessential transition fruit. They bake up perfectly into cakes (the German cake, Pflaumenkuchen, a yeasted dough baked with plums on top until they’re jammy and soft, is one of my favourite cakes), but I thought I’d go for a light, summery raw vibe.

A creamy, soft filling, flavoured with plums and vanilla (and perfectly pink!), is topped with slices of ripe, sweet plums. It’s slight girlish, like a giggle. But, it’s not sickly sweet or over the top, with a balance between the fresh plums, sweet dates and creamy cashews. (Even Adam, who is rarely a fan of raw desserts, thoroughly enjoyed these little tartlets.) If you’re in the northern hemisphere, with no plums at hand, I’d suggest blueberries, raspberries, or even blackberries as a good substitute (frozen would be fine).

So long summer, you’ve been grand. X

almonds
plum preparation split
saying goodbye to summer
plum tartlets
raw plum tartlet
ready for a bite

raw plum tartlets

makes 4 12 cm tartlets

recipe notes

  • it is only worthwhile making these with soft, sweet plums. if decent plums aren’t available, blueberries, raspberries or blackberries would make a delicious substitution. as would figs, or mango.
  • don’t be tempted to over-sweeten the filling as you are making it – the bases are very sweet.
  • these can be made ahead and stored in an airtight container (still in their tins) in the freezer until required. remove from the freezer and top with fresh fruit when ready to eat.

ingredients

for the base:

  • 1 cup (140g) raw almonds
  • 6-8 medjool dates, pitted
  • a pinch of sea salt

for the filling:

  • 3/4 cup (100g) raw cashews, soaked overnight or at least 4 hours
  • juice of 1 lemon
  • seeds of 1/2 vanilla bean
  • 4 tbsp extra virgin coconut oil
  • 2 tbsp maple syrup
  • 4 tbsp cold water
  • 1/2 tsp ground cinnamon
  • 1 plum, stoned and flesh diced (about 1/2 cup)

to serve:

  • 3 plums, stoned and sliced very thin (~0.5 cm thick)
  • 1 tbsp pistachios, finely chopped

In a food processor, blend almonds with a pinch of salt until they form a fine meal. Add dates and blend to combine – the ‘dough’ should hold together when pressed between your finger and thumb.

Divide the base mixture evenly between four 12 cm fluted tartlet tins (the kind with a removable base). Using moist fingers, press the base firmly and evenly around the tins. Place tartlets in the freezer until required, or at least 45 minutes.

Meanwhile, in a blender, combine all the ingredients for the filling. Blend on high until silky smooth. This could take a few minutes (depending on your blender), and will required the sides of the blender to be scraped down with a spatula a few times.

Equally divide the filling between the tartlets, gently tap pin the sides of the tine to settle the mixture. Return tartlets to the freezer for 2-3 hours, until solid.

To serve, remove tartlets from freezer 15 minutes prior to serving, and let them sit at room temperature. Arrange plum slices on top, and sprinkle with chopped pistachios.

roasted carrot + ginger ninja soup

roasted carrot + ginger soup

There’s something about a good soup recipe. Even better – a soup recipe that uses up all of those random carrots that I tend to find at the bottom of my vegetable crisper. I swear, they seem to multiply down there when I’m not looking.

Soup is something I cook when I know I’m going to be short on time, but still want something satisfying, wholesome and soul-filling. This soup reaches right down to the bottom of your toes, filling you up with a ginger-y warmth that tingles on your tongue.

It’s also a nutritional powerhouse. Lots of onion, garlic + ginger (all awesome for digestion and discouraging cancer), carrot (vitamin A), turmeric (stellar inflammation fighter), and miso. Inspired by this recipe from smitten kitchen, I decided to adapt it to my tastes by roasting all the vegetables first. This intensifies their flavour and gets rid of some of the moisture, which should prevent a watery soup. Most soup recipes can be adapted to a roasting method, and they all do better for it I think.

Around here lately, it’s been hot, and humid, and generally quite disgusting. But I still want to eat this soup – it’s like a big umami hug. Life feels busy at the moment, but productive and whole. Let’s just say I’m enjoying being present – it feels good. X

carrots
chopped up
carrot-soup-combo
soup w trimmings

roasted carrot and ginger ninja soup

serves 4-6

recipe notes

  • this soup is delicious as is, but i also imagine that the addition of a bit of sweet potato, pumpkin or normal potato wouldn’t hurt it either
  • the sesame oil to finish is something you really shouldn’t skip. this soup is also delicious served with a scoop of brown rice and some roasted (or fresh) tofu.
  • i give two methods for blending the soup – my preference is for blending in batches in a blender, as I find that I get a much smoother, creamier result – but it’s your preference.

ingredients

  • 700 g (1 lb 8 oz) carrots
  • one decent thumb-sized piece of ginger
  • 1 large (~200g) zucchini
  • 1 large (~160 g) onion
  • 3 fat garlic cloves
  • 2 tbsp olive oil (not extra virgin)
  • 2 tsp turmeric
  • 1/4 c shiro miso paste
  • 5-6 cups of vegetable broth or water

to serve:

  • sesame oil
  • shichimi togarishi (Japanese seven-spice mix)

Preheat oven to 190 C (375 F). Roughly slice the carrots, and zucchini (leaving the carrot peel on). Roughly dice the ginger and onion (no need to peel the ginger either!). In a large baking tray, toss the carrot, zucchini, onion and ginger with the olive oil. Do not salt at this stage – there will be plenty of salt in your miso and broth. Wrap the whole garlic cloves in foil and nestle somewhere in the tray. Place the tray in the oven and bake for 45-55 minutes, until everything is soft and lightly browned.

When cooked, remove the vegetables from the oven. Squeeze the soft garlic from its skins. You can now proceed in two ways: (1) blend the cooked vegetables with the remaining ingredients in a blender in batches, and combine the batches in a large saucepan to heat up again. Or (2) place the cooked vegetables with the remaining ingredients in a large saucepan and blend with an immersion blender. For both methods, adjust with more or less liquid to achieve your desired thickness.

Warm the soup for a few minutes – it shouldn’t have lost too much heat during the blending. Serve with a drizzle of toasted sesame oil, and a little bowl of shichimi togarishi on the table for sprinkling.

taco fiesta + raw garlic sauce + simple tomato salsa

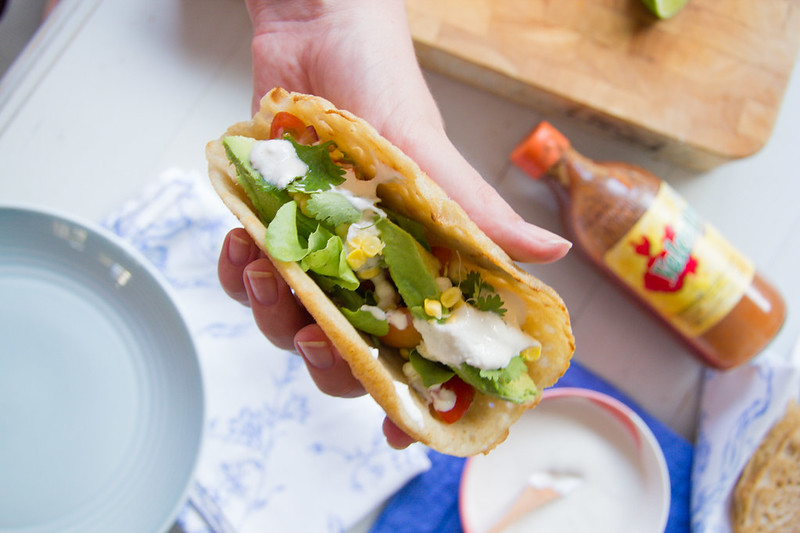
taco assembly

We’re big into Mexican flavours in this house. Burrito night at our favourite Taqueria is at least once a week, and at home, burrito bowls, mini-burritos and tacos make a regular appearance. There’s something magical about the bringing together of corn, lime, tomatoes, avocado, beans and chilli. It’s fresh and tasty and always satisfying.

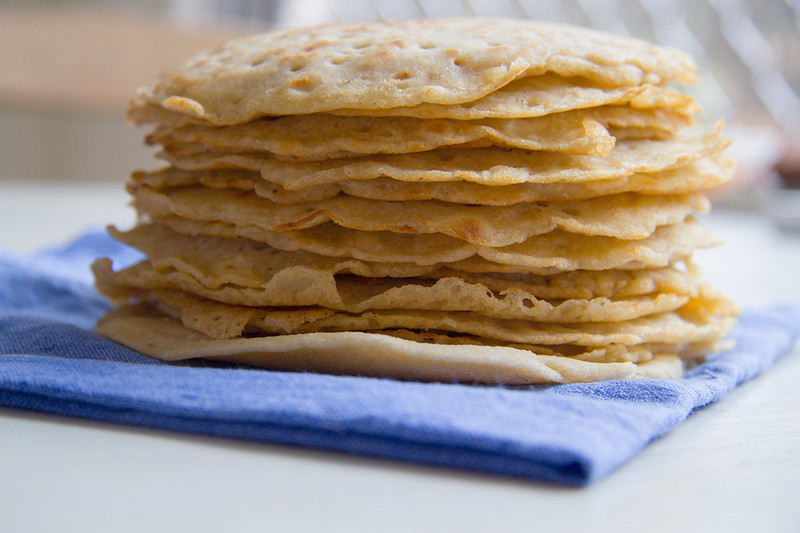
Here I’ve included a little recipe for corn-free and gluten-free taco tortillas (adapted from Elenore’s recipe over at Earthsprout). They’re definitely not traditional or authentic in any sense, but I think they’re a nice little change. Also – unlike the gluten-free tortillas you can get from the supermarket, they’re not full of numbers (because numbers are crap). These tortillas are best served straight away, but the next day they also work up nicely into a quesadilla.

The accompaniments are also crucial – lime-y tomato salsa, and a raw garlic sauce that is just so delicious. It uses cashews as the base, so the sauce is creamy and smooth. It’s also great over soups, in sandwiches, on top of salads, or as a dip.

One of my favourite aspects of this sort of meal is that you really can put almost anything in a tortilla – it really depends on what you’ve got on hand – some of my favourites are: fresh (raw) corn, salad mix, avocado, massaged kale, black beans, coriander leaves, sliced spring onions. Basically whatever is good.

Adam and I enjoyed this taco feast last Friday for Valentine’s day, and the next day, the leftovers were just as good. Happy taco-making, friends!

taco-split
simple salsa
tortilla stack
assembly line
taco spread
taco

multigrain tortilas

makes about 15 taco-sized tortillas

adapted from Earthsprout

notes:

  • these are best served straightaway, however the next day they’re excellent warmed and then used to make quesadillas

ingredients:

  • 1/2 c buckwheat flour
  • 1 c millet flour
  • 1 c brown rice flour
  • 1/2 tsp baking powder
  • 1/2 tsp salt
  • 2.5 c water
  • 4 tbsp olive oil + more for frying

In a large bowl, combine flours, salt + baking powder. Create a well in the centre, and pour in the water and oil. Whisk to combine. All to sit for 10 minutes – by this time, the batter should have a thick, but flowing consistency.

Heat a frying pan over high heat. Lightly brush with oil. Using a 1/4 cup measuring cup, pour 1/4 cup of batter into the pan, tilting it to spread the batter around. Cook for 1 minute or so, until bubbles have formed and the surface is no longer shiny. Using a spatula, flip and cook for another minute.

Remove the tortilla from the pan and wrap in a tea towel – this step is crucial as it traps the steam and softens the tortilla, making it possible to use it for tacos.

Repeat with remaining batter, making sure to lightly re-oil the pan for each tortilla. If not eating immediately, wrap in your tea towel and store in an airtight container in the fridge until needed. The tortillas can be reheated by covering in a damp tea towel and gently heating in an oven until hot.

simple tomato salsa

makes ~ 1 cup

ingredients

  • 125 g cherry tomatoes, diced small
  • 1/8 large, or 1/4 small red onion, diced small
  • pinch of salt
  • juice of 1/4 lime

Combine all ingredients in a small bowl and allow the flavours to mingle for 30 minutes before serving. The salsa will keep in the fridge for 2 days or so.

raw garlic sauce

makes ~ 3/4 cup

ingredients

  • 1/2 cup raw cashews, soaked for 4 hours or overnight, then drained
  • 1 fat, or 2 small, garlic cloves
  • pinch of salt
  • 1 tbsp olive oil
  • juice of 1/2 lemon

Combine all ingredients in a blender (the higher the speed, the better). Blend on high until the sauce is thick and silky smooth – this make take some time, and will require you to scrape down the sides of the blender every so often. It may be necessary to add 1-2 tbsp water to thin, if desired – but take care to only add 1 tbsp at a time. The sauce should be pourable but not watery. Pour into a glass jar and store in the fridge until required, where it will keep for 3-4 days.

taco fiesta filling ideas

  • mixed salad leaves
  • fresh, raw corn corns
  • fresh coriander leaves
  • sliced avocado
  • hot sauce (naturally)
  • lime wedges
  • black beans
  • sliced spring onions

raspberry + rosewater (valentine) smoothie

valentine-smoothie

Valentine’s Day – it’s pretty commercial, and I’m not into that side of it – but I’m definitely ok with taking a moment to express gratitude for the friends, family, and loved-ones that constantly bring joy and love into my life. And chocolate. I’m definitely ok with the chocolate.

This past year I’ve also really woken up to the truth of loving yourself so you can better love others. So in the spirit of that intention, I’ve created a delicious (and probably over-the-top) smoothie that loves your body as much as you’ll love it (I hope). It’s packed full of raspberries, banana and pear, and made extra kitschy by the addition of rosewater. Topped with rose petals, cacao nibs and pistachios, I think it fulfils nearly every corny Valentine’s requirement.

Happy Valentine’s Day friends, whoever you’re loving. For me, I’m going to try and carry that open expression of love throughout the rest of the year. XX

valentine smoothie ingredients
rose petals
love in a glass
valentine smoothie: raspberry and rosewater

raspberry + rosewater smoothie

serves 2 as a snack, 1 as a meal

recipe notes

  • if you’re not into raspberries, strawberries are also delicious

ingredients

  • (~70 g or 1 small) frozen banana pieces
  • 1 cup (120g) frozen raspberries
  • 1 small (~90g) pear, cored and diced
  • scant 1 cup (220 ml) cashew milk (or almond/soy/oat/cow etc)
  • 1 tbsp maple syrup/honey/agave
  • 1/2-1 tsp rosewater
  • to serve: cacao nibs, organic dried rose petals, chopped pistachios

In a blender, combine banana pieces, raspberries, pear, cashew milk and maple syrup (or other preferred sweetener). Blend on high speed until smooth and silky. Add 1/2 tsp rosewater, blend and then taste. Adjust sweetness if you would like it sweeter, and add more rosewater if you desire (it can be overpowering, so it’s better to start small and add a little bit at a time).

Pour into glasses and top with cacao nibs, rose petals and chopped pistachios. Soak up the love!

buckwheat granola + breakfast oats for one

granola

Hello – right off the bat – I missed you guys. But now my chapter is in (fucking, yeah!) and I can return to my little corner of the internet newly reinvigorated and ready to fill your screens with marvellous things. Ready?

I’ve had several little realisations lately – like that my favourite colour is yellow, not blue – or that the metal circle on the side of my toast tongs is a magnet (genius, by the way) – or that to make the perfect French press coffee you need to plunge straight away – or that granola is almost infinitely tastier and better in every dimension when you make it with buckwheat, not oats.

Madness, you say? Maybe, but the right kind of crazy, I assure you. Making granola on buckwheat requires a teensy bit more prep (soaking), and a longer, slower cooking time, but it’s absolutely, assuredly worth it. The buckwheat absorbs a lot of liquid during soaking which then evaporates in the oven, leaving crunchy crunchy deliciousness. It’s also fragrant and tasty in a way you could never achieve with oats. I’m not saying I’ll never make granola with oats again, but this buckwheat version is going to be in very frequent rotation (bonus: it’s totally gluten free!).

Now that I’m back on campus and the working year has commenced, breakfast suddenly becomes a very important part of my day. I’ve been doing lots of breakfasts in jars – make them the night before (or even days before), and in the morning you’ve already made a good choice (go you!). I can grab it out of the fridge and take it to uni if I’m in a rush, or eat it at home. Easy peasy. Soaked oats, birchers, chia puddings have all been getting a good work over in my mason jar. Here I’ve got the simplest, most basic version of soaked oats I make. Treat it as a base to use whatever fruit or toppings you have around. Berries, granola, cacao nibs, stewed plums, and almonds all make regular appearances. But spiced stewed apples or pears would also be freakin’ delicious. Make it your own, lovelies!

raw buckwheat tight
buckwheat-granola-split
mix-ins
easy breakfast
layered oats + granola
buckwheat granola
stripey stripes
buckwheat granola feast

buckwheat granola

makes ~2-3 cups

recipe notes

  • this recipe has a long cooking/prep time, but – before you run away – it’s mostly inactive – which means you can have a cup of tea and watch a movie/read a book/be awesome while the granola’s doing its thing
  • really make sure you give the buckwheat a good rinse after the first soak to get rid of the slimy coating it develops
  • if you’re not into seeds or cranberries, feel free to substitute – i’m a lazy cook, so seeds appeal to me because hey, no chopping
  • if your granola still seems too wet after 1.5 hrs, keep checking every 10 minutes or so until it seems dry enough, bearing in mind that it will crisp up as it cools

ingredients

  • 1 cup (200 g) raw buckwheat groats
  • scant 1/2 cup (60 g) sunflower seeds
  • scant 1/2 cup (60 g) pepitas (pumpkin seeds)
  • 1/3 cup (40 g) dried cranberries
  • 2 tbsp (25 g) sesame seeds
  • 2 tsp vanilla extract
  • 2 tbsp olive oil
  • 3 tbsp maple syrup
  • pinch of salt
  • 1 tsp ground cinnamon

Place the buckwheat in a bowl, cover with filtered water and soak for 1 hour. After 1 hour, drain, rinse well, and cover the buckwheat with fresh water and let soak for another 45 minutes.

Preheat oven to 120 C (250 F) (no fan). Line a baking tray with baking paper. Line a strainer with cheesecloth and drain the buckwheat, rinsing again. Let the buckwheat sit and drain for 10 minutes.

Meanwhile, combine the remaining ingredients in a large bowl. Once the buckwheat has drained, add it to the other ingredients, stirring thoroughly to coat. Tip the granola onto your baking tray and with wet hands, work it into as flat a layer as possible. Place in the oven for 1.5 hours. When cooked, the granola should be lightly golden and not feel completely wet to the touch. Remove from the oven and allow to cool completely. It should form little granola sheets as it cools. Store in an airtight container at room temperature for 1-2 weeks (though mine never lasts that long).

breakfast oats for one

serves one

recipe notes

  • as I mentioned above, this recipe is a completely blank slate – do with it what you will – fruit, toppings, flavourings can all be customised to your whim. in this version I’ve topped mine with 2/3 c frozen blueberries and a decent handful of buckwheat granola.

ingredients

  • 1/3 cup rolled oats
  • 1 tsp chia seeds
  • tiny pinch of salt
  • 1/2 c milk of your choice (almond, cashew, soy, whatever) or even water
  • squeeze of lemon juice
  • optional: berries (even frozen – they defrost by the morning); stewed plums, apples, granola, nuts, seeds, cacao nibs, ad infinitum.

In a 400 mL glass jar (with a screw top lid – mason jars are perfect), combine the oats, chia seeds and salt. Give in a quick mix, then stir in the milk/water and lemon juice. Top with some fruit, granola or your toppings of choice. Seal the jar and leave in the refrigerator overnight.

In the morning, it’s ideal to let the jar sit for 5-10 minutes at room temperature, but not necessary. Enjoy!

christmas spice mix + spiced pear tart

christmas-spiced pear tart
christmas spice mix

Friends, I feel I’ve let you down. It’s only 9 days (!) until Christmas, and not one festive recipe has graced these pages! I blame it on our weather (one hardly feels like baking in this heat), and on the fact that I really struggled to find something I feel is original and inspiring enough for me to share with you all. So I started thinking about my favourite things about Christmas – what food would I have at the ‘perfect’ Christmas lunch? what would it smell like? And I realised that my favourite thing about festive eating is the flavour and combination of christmas spices.

Here is my secret weapon: Christmas spice mix. A potent blend of coriander seeds (yes, you read that correctly!), cinnamon, nutmeg, allspice, ginger, clove and cardamom. Once sniff (or taste) and I’m instantly transported to a land full of garlands, baubles and carols. Coriander plays a really important role in this spice mix – so don’t think you can leave it out – it’s citrus and floral notes pull all the other spices into line, providing the perfect foundation from which you can pick out the warmth of cinnamon, the sharpness of the clove, the sweetness of the allspice.

This spice mix also makes a perfect gift – incorporated into baking, stirred into porridge (hey – even blended with a banana smoothie) – I guarantee that it will be able to recall a little feeling of Christmas throughout rest of the year. I made a triple batch of the recipe below and stored some in bottles for friends and family.

Lastly, pears and this spice mix make the best of friends. This tart is simple to make, with a no-roll dough (based off a recipe from Greek Kitchen Stories) filled with almonds and oats. The combination of Christmas spices, pear, and a nutty crust is delicious and soul-warming. It’s not fussy, but rather robust, and can be made in advance, then baked off when needed. Perfect for a busy festive season, no? (It would be blissful topped with your favourite ice-cream, or vanilla cashew cream).

I hope these last days of the silly season are greeting you with happiness and many festivities. X

p.s. The last photo should give you some insight into my oh so fancy set up for shooting photos…

christmas spices
a lot of christmas spice
pear
about time for the oven
spiced pear tart
happy accident

christmas spice mix

makes about 1/3 cup

recipe notes

  • If you don’t have ground spices, you can grind them using a mortar and pestle or a spice grinder.
  • Spice mixes are best within 1-2 months of mixing, but if stored in an airtight container in a cool, dark spot, should retain most of the flavour for a longer period.
  • This spice can be used in making gingerbread, apple pie, porridge, or as a delicious addition to smoothies or hot chocolates.

ingredients

  • 4 tsp ground coriander seeds
  • 4 tsp ground cinnamon
  • 1 tsp ground nutmeg
  • 1/2 tsp ground allspice
  • 1 tsp ground ginger
  • 1/4 tsp ground cloves
  • 1/4 tsp ground green cardamom seed

Combine all the spices in a small bowl and stir to combine. Store in an airtight glass jar and keep in a cool, dark place.

spiced pear tart

serves 6-8

recipe notes

  • If you don’t have a 35 x 13 cm rectangular tart tin, use an 8″ circular tart tin and use the proportions of ingredients in the original crust recipe, and use only 2 pears.
  • This recipe would also work lovely with apples.

for the crust

  • 1.5 cups (150 g) quick or rolled oats
  • 1 cup (100 g) almond meal
  • 3 tbsp corn flour
  • pinch of sea salt
  • 5 tbsp coconut oil
  • 3 tbsp maple syrup or honey

for the filling

  • 3 ripe, but firm pears – peeled, cored and sliced
  • juice of 1/2 lemon
  • 1 tsp panela or raw sugar
  • 2 tsp christmas spice mix
  • 2 tbsp coconut milk

In a large bowl, combine oats, almond meal, cornflour, and salt. Create a well in the centre, and mix in the coconut oil and sweetener. Use your hands to rub the mixture until a loose dough forms (it will be very crumbly). Wrap the dough in aluminium foil or cling wrap and refrigerate for at least 30 minutes (this will help the dough be less crumbly).

Meanwhile, preheat oven to 150 C (300 F). In a large bowl, toss the pear slices with the lemon juice, sugar and spice mix, then set aside. Once the dough is chilled, remove from the fridge and press evenly into a 13 x 35 cm fluted tart tin. Bake the crust in the oven for 10 minutes.

Remove the crust and turn the oven up to 175 C (350 F). Arrange the pear slices inside the crust, and return to the oven for 20 minutes. After 20 minutes, open the oven and pour the coconut milk over the pears. Bake for a further 10-15 minutes, until the the pears and edges of the crust are golden brown.

Remove from the oven and allow to cool completely in the tin. Carefully remove from the tin, slice and enjoy. Can be stored at room temperature for 2 days.

blackberry + spelt mini loaves

blackberry + spelt mini loafs

How you know you’re on holidays: You type ‘loafs’ in the title of this post, and stare at it for a good 30 seconds before realising that it’s wrong. Then having to check the dictionary just to make sure you got it right. Phew.

It’s been a big year, friends. HUGE, really. And boy, am I glad to be on holidays. That being said, I’m still going through the awkwardness of those first few days – figuring out what I’m going to do each day, trying as best I can not to set enormous list of goals, slowly relaxing and letting things go. I’m sure most people can relate. Here however, is a short précis of what I’ve got in mind: yoga. walks. beach. day trips. food. books. And Christmas (holy cow – only two weeks away!).

I made these little loaves over the weekend when I visited a friend – perfect for tea or coffee time in the afternoon. It was magic to get lost in conversation for a few hours. The loaves are soft, moist and utterly yum. There’s a slightly nutty flavour from the spelt flours, which plays off really well against the tart berryness of the blackberries. They are quick and easy to make, and if you don’t have a mini loaf tin, can be made in a muffin tin I’m sure (making 12 muffins).

If you’re not into blackberries (or don’t have any around), feel free to substitute with your favourite berry (raspberries or blueberries in particular) or even apple, pear or peach would work nicely. This recipe is more than versatile – shape it to your whim, lovelies.

My holiday brain is struggling with what else can be said – just take my word for it – they’re pretty great.

loafin' around
tea time?
mini loaf
gone

blackberry + spelt mini loaves

makes 8 mini loaves or 12 muffins

recipe notes

  • As I note above, these can be made in your standard muffin tin, and should yield 12. You will have to adjust your baking time (perhaps 20 minutes instead of 25).
  • Substitute for your favourite berry or fruit if you prefer.
  • Also – feel free to run wild with your favourite add ins – lemon zest, seeds and nuts would all work great.
  • To make one flax egg, combine 1 tbsp flaxseed (linseed) meal with 2 tbsp boiling water. Whisk with a fork and set aside for 10-15 minutes before using.

ingredients

  • 1 cup (160 g) wholemeal spelt flour
  • 1 cup (130 g) light spelt flour
  • 2 tsp baking powder
  • 1/2 tsp salt
  • 3/4 cup (90 g) organic panela sugar (evaporated cane juice)
  • 2 flax eggs
  • 1 cup (250 ml) coconut milk
  • 1 tbsp coconut oil, melted (plus extra for greasing)
  • 1/4 cup (60 ml) unsweetened applesauce
  • 1 tsp vanilla extract
  • 3/4 cup frozen blackberries

Preheat oven to 175 C (350 F) – no fan. Prepare flax eggs. Using some extra coconut oil, grease your tin.

In a large bowl, sift together the flours, salt, baking powder. Add the sugar to the flour mixture and whisk to combine. In a medium bowl, whisk together flax eggs, coconut milk, coconut oil, vanilla and applesauce. Add the wet mixture to the dry mixture, and stir until just combined. Spoon batter evenly into prepared mini loaf tin, and gently press blackberries into the batter. Bake for 25 minutes, until a cake tester comes out clean and the loaves are a light golden brown.

Remove from the oven, and allow to cool in the tin for 30 minutes, then gently remove mini loaves from the tin with a spatula. Can be refrigerated for 3-4 days.

lentil, quinoa + greens salad w lime + mustard dressing

lentil + greens salad w lime + mustard dressing

enormous pot of mint

It’s no secret that I don’t have the greatest green-thumb. In fact, I have a pretty great track record of killing plants. Combine that with the fact that we have a resident possum that loves anything green and leafy, and it makes it a little difficult to grow anything super delicious. But, I’m making progress I think – so far, the rosemary, chives, lemon balm and mint are all still standing. And oh my, the mint. I have so. damn. much. of it. It’s never-ending.

But really, this isn’t a post totally about mint, it’s about this salad. Because as much as I love mint on its own, mint does really special things when it’s combined with parsley and lentils and a delectable dressing.

I made this salad on the weekend for the very fancy Hannah’s birthday get-together. I wanted a salad that was sturdy, that likes (nay, LOVES) dressing, that was filling, and wasn’t going to look like it had been sitting in a hot room (you know, that sort of wilted and sad look lettuce gets if it’s been in contact with dressing for more than 10 seconds?). And I think this one fits the bill (not to mention that it’s completely allergen-friendly!). That being said, if you wanted it would be delicious with some baked tofu, or roasted pumpkin, or sourdough along side it, if you so desired.

Lastly, can we just pause on the realisation that it’s December? Where in the world did this year go, sheesh. When I think back on all that’s happened this year, and all that I’ve managed to achieve, it truly, really, boggles my mind. Finally, though, work has basically wound up for the year – only two meetings this week and then I’m on holidays! – And I’m also now allowing myself to get excited for Christmas – last night we decorated, and I’m stoked to get into some serious Christmas cooking. Which reminds me – what would be at your ideal Christmas meal? I’d love to know, so please leave a comment below.

With big, relieved, almost-on-holidays hugs, H x

fennel heart
preparing the salad
mint 1
lime + mustard dressing
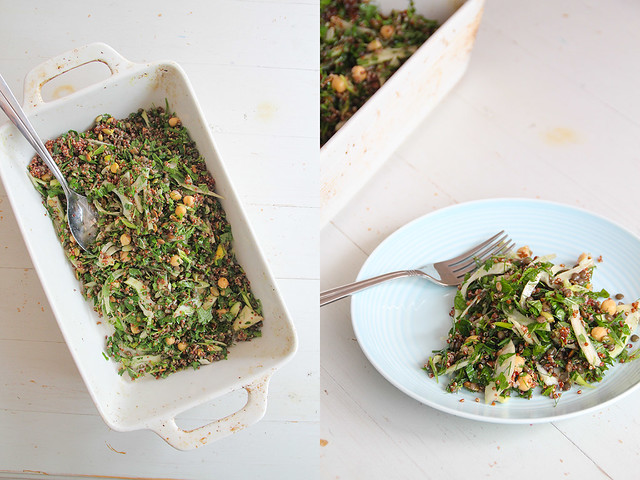
lentil, quinoa + greens salad

lentil, quinoa + greens salad w lime + mustard dressing
serves 4-6
recipe notes

  • Of course, feel free to substitute regular quinoa (or what about millet? or wild rice?) instead of the red quinoa if you prefer.</em?
  • If you like, adding some wholegrain mustard to the dressing would also be a stellar idea.
  • I’ve given the cooked measurements for both the lentils and quinoa – my advice is to make a big pot of both: use some for this salad, then sequester the rest away in your fridge for easy meals the next few days.

for the salad

  • 1.5 c cooked French lentils
  • 0.5 c cooked chickpeas
  • 1.5 c cooked red quinoa
  • a generous handful of mint, chopped
  • a generous handful of flat-leaf parsley, chopped
  • 1/3 c pepitas, toasted
  • 1/2 bulb of fennel, tops removed, fronds chopped and bulb thinly sliced
  • 1 spring (green) onion, thinly sliced

for the dressing

  • juice and zest of 1 lime
  • 3 tbsp extra virgin olive oil
  • 1/2 tsp dry English mustard
  • sea salt and pepper

Start by preparing the vegetables for the salad, chop and slice away. In a large bowl, combine all the salad ingredients and gently toss. Prepare the dressing by combining the juice, zest, oil and mustard in a glass jar, securing with a lid and shaking vigorously to combine. (Alternatively you could whisk everything in a small bowl.) Taste the dressing, and adjust the seasoning with sea salt and pepper to your liking. Pour the dressing over the salad and toss again to coat thoroughly. Store in the refrigerator until serving.

mango coconut creamsicles

mango and coconut creamsicles

If summer in Brisbane had a flavour, I’m reasonably sure that it would taste like these creamsicles. Fruity, mango-y, creamy. I really, really, like these creamsicles. You know what I like even more? How smile-inducingly simple they are. There’s no need for added sugar, or topping up with liquids. Throw everything in the blender and you’re there. The perfect summer dessert, no?

A few weeks ago, my mum and I split a tray of lovely mangoes. And, for a few days, Adam and I ate mangoes at nearly every meal. Sliced over breakfast, creamsicle after lunch – heck, we even had Laura’s marinated cucumber noodles over a thick wedge of mango. The good news is, mango season is far from over (it’s not even officially summer yet). And I’m pretty sure that I’m going to spend most of this summer subsisting on LARGE quantities of fruit. Because as I’ve mentioned before, I do not handle heat well (yesterday it was certifiable disgusting – over 30 C (86F) and 65% humidity – needless to say I spent most of the day napping), which means that any food that is cold and only requires a minimum of peeling and cutting is fair game.

I’m going to keep this short and sweet today – I’m presenting at a conference on Thursday, and my paper is well, you know…(not even started)…so I’d better be getting to work. Big love to you all – H.

mango
mango too
creamsicles ready for the freezer
untitled
creamsicles in a row
best summer dessert
 
mango coconut creamsicles
makes 10
 
recipe notes

  • My popsicle moulds take 1/3 cup of mixture (which I think is pretty standard).
  • I’m going to be pretty insistent on using the vanilla bean directly. Extract isn’t going to cut it here.
  • You’ll also need 10 popsicle sticks – I can pick these up pretty easily from a newsagent or craft store.

ingredients

  • 450 g mango flesh (2 large mangoes’ worth)
  • 1/2 vanilla bean, seeds scraped
  • 1/4 lime, juiced
  • 1 can (270 ml) whole coconut milk

In a high-speed blender, combine all ingredients and blend on high until smooth and creamy. Evenly pour into your popsicle moulds. Freeze for 30 minutes, then insert popsicle sticks. Freeze for a further 2-3 hours, until fully frozen. To enjoy, run the mould under a little hot water to loosen the creamsicle.

basic chocolate cake + simple raspberry sauce

basic chocolate cake
simple raspberry sauce

This is a recipe that everyone should have tucked into their back pocket, their notebook, or bookmarks folder. A basic, solid chocolate cake recipe. A ‘no-fail’ recipe. Something that works, that can be built upon; dressed up or dressed down depending on the occasion. It’s not flashy or fancy. It’s not highly sweet. It’s the sort of cake that loves being slathered in sauces and yoghurts and ice-creams. It likes a few blackberries tucked in beside it, or a drizzle of maple syrup over the top.

Things have finally begun to slow down around here: classes have finished, and tutoring is done for the year; our German lessons have finished and the exam is done. A big, long, sigh of relief. We’re both settling back into our own research, and I’m finally starting to think about Christmas, and am having some lovely and exciting ideas. On the food front, I’ve been trying to be kinder to myself. When I’m stressed or anxious, the first thing I do is become incredibly rigid and restrictive with what I’m eating, which really, is the last thing my body or mind needs at that point. That being said, I’ve been avoiding most sugar after reading this book, and this cake is the product of the desire to make a cake without the syrups or substitutes I would normally use. (A little aside: I highly recommend David Gillespie’s Big Fat Lies: an excellent collection of the latest research surrounding sugar, health, and the debate over saturated vs polyunsaturated fats. Eye-opening stuff, peeps.)

Sweetened (only slightly) with some organic apple sauce, the cake itself is moist and fudgy, with a robust, solid crumb. A basic chocolate cake recipe, and especially a basically unsweetened one like this, gives you the opportunity to go crazy with the accompaniments. Here I went for a simple, delicious raspberry sauce (that is equally as good over some coconut yoghurt, or cashew cream – you get the idea, right?). But really, the possibilities are endless and only restricted by what you have in the cupboard. A date and tahini sauce. Blackberries and vanilla cashew cream. Macerated strawberries. Roasted strawberries. Blueberry compote.

So, go forth and eat cake! (And make this cake your own.) X

P.S. molly, ily is now on Facebook. Aside from blog posts, I’m also sharing links to articles, photos and other things I find interesting (and you might too!).

P.P.S. Totally not food related, but my incredibly talented friend Reana (of Reana Louise), made me a dress, and I’m wearing it over on her blog. (Please excuse the bad hair day, ha).

serious chocolate cake
basic chocolate cake + a simple raspberry sauce
cake time

basic chocolate cake

makes one 8 inch cake
adapted from 101 cookbooks

recipe notes

  • This is not a sweet cake – if you would like it sweeter, try adding 1/4 cup of your preferred sweetener. If you are using a liquid sweetener, decrease the amount of applesauce by the amount of liquid sweetener you add.
  • If raspberry sauce isn’t your thing, check out the body of this post for lots more serving suggestions.
  • To make one flax egg, combine 1 tbsp flaxseed (linseed) meal with 2 tbsp boiling water. Whisk with a fork and set aside for 10-15 minutes before using.

ingredients

  • 2 cups (310 g) wholemeal spelt flour
  • 1/2 cup (65 g) light spelt flour
  • 3/4 cup (50 g) cocoa powder
  • 1 tbsp baking powder
  • 2 flax eggs
  • 1 cup (250 ml) light coconut milk
  • 1/2 cup (125 ml) coconut oil, melted
  • 1 cup (250 ml) unsweetened applesauce
  • 1 tsp vanilla extract

Preheat oven to 175 C (350 F) – no fan. Line the bottom of an 8 inch (20 cm) springform tin with baking paper, and lightly oil the sides. Prepare flax eggs.

In a large bowl, sift together the flours, cocoa, baking powder. In a medium bowl, whisk together flax eggs, coconut milk, coconut oil, vanilla and applesauce. Add the wet mixture to the dry mixture, and stir until just combined. Spoon batter into prepared tin and bake for 40 minutes, until a cake tester comes out just clean.

Remove from oven and allow to cool for 10 minutes in the tin, before removing the tin and cooling completely. Serve at room temperature, smothered in raspberry sauce. The cake will keep in an airtight container in the fridge for 3-4 days.

simple raspberry sauce

makes about 1.5 cups

recipe notes

  • This sauce is delicious over almost anything (yoghurt, icecream, granola, porridge).

ingredients

  • 150 g (1.5 cups) frozen raspberries
  • 70 g (5 large) medjool dates, pitted
  • juice of half a lemon

Using a large knife, roughly mince the dates. In a small saucepan over medium heat, combine dates, lemon juice and 1/2 cup of water. Using a wooden spoon, stir the mixture vigorously while it heats – the dates will breakdown and form a thick, caramel coloured sauce. Add the raspberries and another cup or so of water. Bring to the boil and simmer for 5 minutes.

Once the berries are starting to break down, remove the pan from the heat and using an immersion blender or normal blender, blend the sauce to until smooth. It should be thick but still pourable. Add more water until your desired thickness is reached. Store in glass jar in the fridge for 4-5 days.